Saturday, April 14, 2012

A Spring is Loose.

 Spring inspires me. There is so much that happens in such a little seasonal window.  After a drab winter it can bring on a much needed revitalization. It is all about new beginnings, a yearly chance to start again. These trees and plants have saved up as much energy as they could last season to prevail through a winter which they didn't know for how long or when they'd get a chance to grow again.
Through this botanical patience they wait for signs of spring; and when it arrives, whether it is the warmer nights and soil temperatures or increased day length the plants begin their yearly adventure. Some bloom long before they break bud, ensuring the passing of their genes before consideration of their own needs. All this fresh foliage brightens my days, as I watch the transition from browns to reds, greens and yellows. it is hard to take a walk without a smile.   
 In life we are given opportunities to start again without knowing the outcome.  Much like a flower's growth each spring; if it knew of a frosty morning in the ten day forecast would that prevent it from trying?  How long do we put things off when we worry of the risks and outcomes, could we miss spring because we are worried of frost?

On Easter Sunday I took a walk with my family and  my camera.  We walked the whole farm, and ended up in my yard. Here is a bit of the signs of spring that I thought were note worthy.
 
The Tulips in my mom's yard had brought out the color for the start of the glorious morning. 

Plum blossoms on green canvas.  Note: Plum blossoms smell much better than pear blossoms.
'Goldheart' Bleeding Heart.  Yet to fully bloom but adding some great color to the yard.

Oak: huge tree, tiny blossoms. 
Maple seeds developing; from the edge of the low ground I saw this tree just speckled with red.  Closer inspection through the swamp revealed the red to be the samaras of the maple providing the glow of red.
Another Maple with its seeds on display. 


The garlic has made it through the winter swimmingly, and in no time they'll be adding much appreciated flavor to nearly every meal in my kitchen. 

Hot air balloon parade to finish off the walk. 
Thanks for joining me on this Spring walk.  I hope your days are full of just enough rain and plenty of sunshine.

Saturday, March 3, 2012

Simplicity Nachos

As I sit here listening to old records, well not too old, the Top Gun soundtrack is playing.  That still dates back to '86 and some would say that it is musically dated.  I am enjoying some nacho's; chips and salsa have always been a household favorite.  I've been known to eat a pretty near a quart of salsa  in a sitting.  Nothing can top our home canned garden salsa.

Today, I decided to spice up my chip routine.  I had some Eichtens Tomato  Basil Gouda and a bit of PepperJack on hand.   I shredded the cheese directly over the platter of chips.  After melting the cheese in the oven, a sprinkling of cilantro over the top provided a bit of zest to the cheesy nachos.

Cheesy Cilantro Nachos

I had all this on hand, simple snack and enjoyable, but far from fancy.  It is hard for me to imagine going to the store with Nacho's being the end goal.  Even so, at a grocery store the options for nachos would clutter this snacks simplicity.  Before one knew it there'd be ground beef or chicken chunks, lettuce, sour cream, a side of guac and even black olives; and this snack would turn into a meal and the end goal would be distorted.

Too often do the options in life distort us from the simple beauty of living.  


Sunday, January 15, 2012

A Kitchen is a crucial part of a Garden.

In all honesty I've been a bit neglectful towards my yard this summer and fall.  It is not as if I've been avoiding everything on my list of outside projects I set forward for myself this year.  I am told it is alright for one's perspectives and priorities to change.

In the wake of factors that shape a man's life and direction; I deemed it high priority to remodel my kitchen.  This was an undertaking I do not take lightly, when it comes to my home there is a slight internal battle between the need to preserve the history and feel of the house while adding the functionality and openness I desired.  The main conflict was a simple one: this home was good enough for Grandma and the strong need I had to take a sledge hammer to the kitchen wall.


As a farmer and a gardener I tend to view the kitchen as an extension of the garden.  It becomes the destination for the garden's bounty.  Whether its simply making daily meals, preserving the harvest or ultimately used for the gathering of friends centered around the shared purpose of food consumption; I wanted this to be a place in my home where these activities could take place and feel natural.  The original layout made a man feel isolated as he prepared a meal for friends or brothers.  The gathering place was in the living room, obscured by a wall, one could easily hear the fun that was taking place but had to keep stirring dinner.  In those countless evenings preparing dinner alone in my kitchen, I began to day dream of a kitchen without a wall.  To allow for interaction with the living room; what a break-through that would be.

I never put a timeline on this day dream.  I had my vision set, though in my view there are certain decisions that need to be shared, and until then; what grandma had was good enough for me. Yet through life's journey I was given  the opportunity to empty the living room, paint the walls and buy new couches... a subtle reboot to the living quarters.  Though the fresh paint looked great it wasn't enough of a facelift I wanted.  So, even before the fresh paint had even dried, I decided one of the walls had to come down.

There may have not been as much jubilation as the tumbling of the Berlin wall, but the overwhelming sense of freedom and progress rushed over me as I stood back and looked past where my range would be through the old stud wall, into the living room and out the window to my yard. This was excitement I had yet to feel about my home, I could feel it becoming mine.  What was just a barren studs holding up my ceiling had already transformed my living space into a new hope.


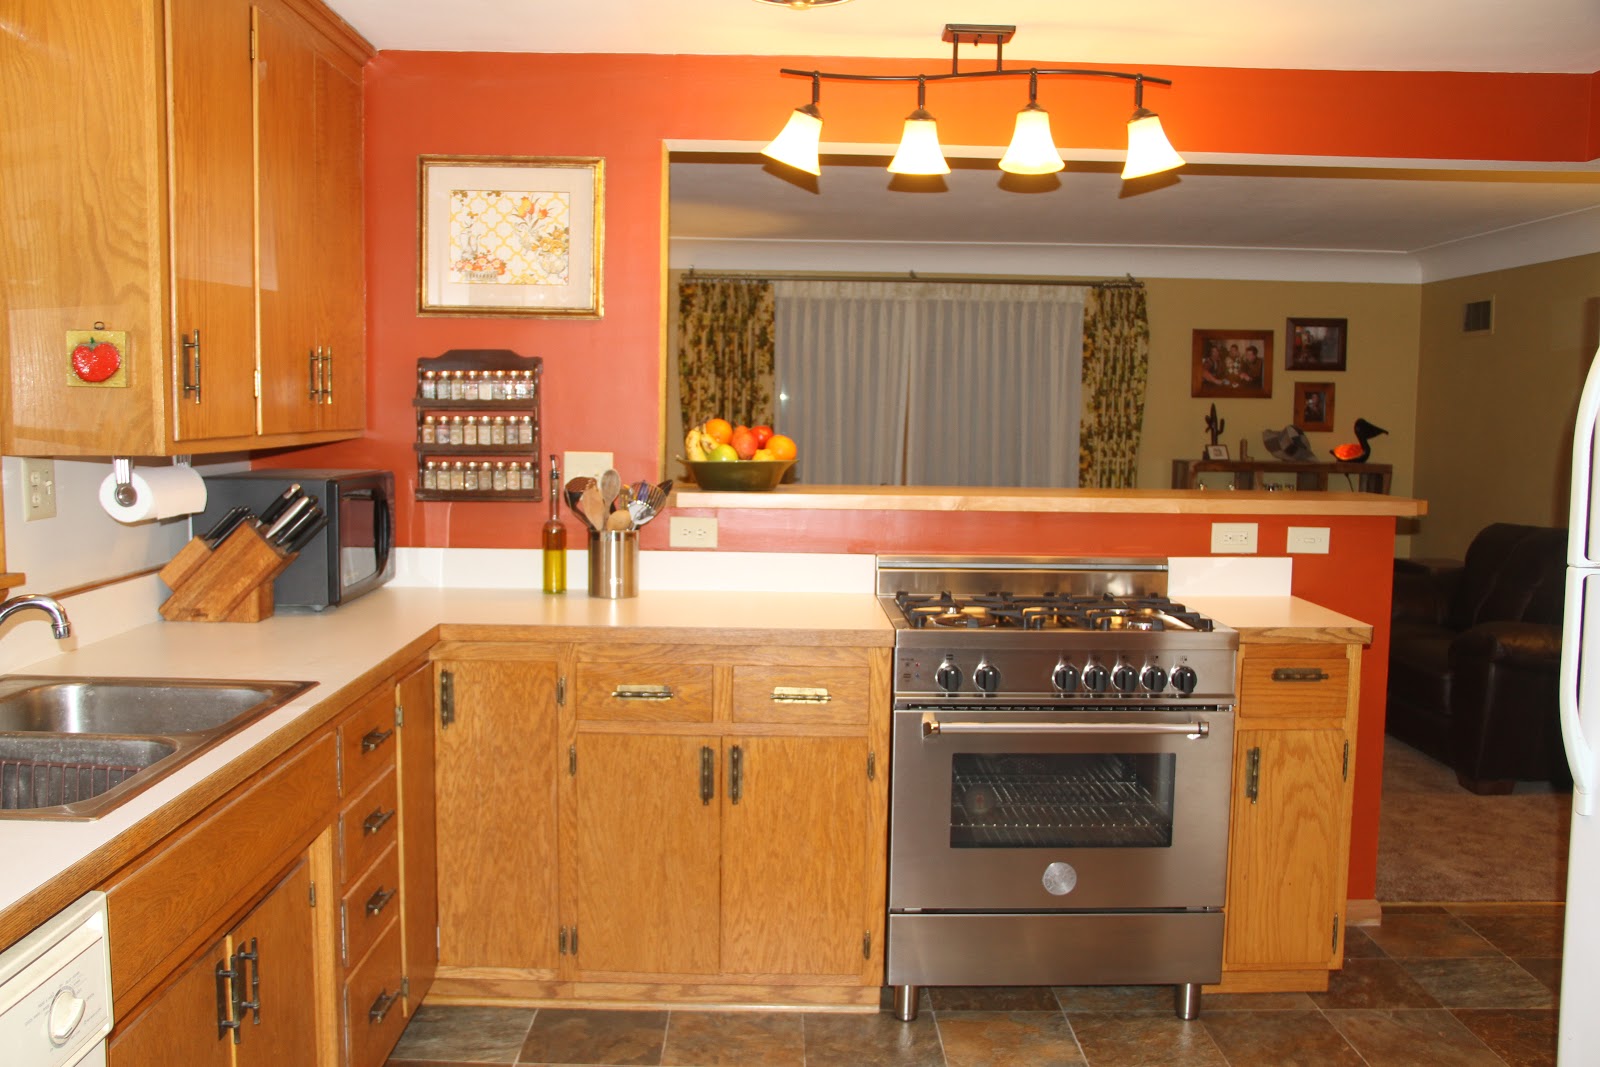
There needed to be balance to the project, I couldn't go through and update everything and rob this 1950's home from its thrifty beginnings.  My main objective  was removing the wall  and replacing it with a high bar counter top to serve as a peninsula.

I opted to leave the existing cabinetry alone and after removing the dated wallpaper, I'd add a fresh coat of paint.  I had read in a food magazine outlining thoughts on the color choices for kitchens, look for inspirations in the kitchen.  The spice rack to be exact, the your color choice be influenced by your favorite spice. I, myself fine excuses to add a bit of chili powder into as much as I can.  This thought brought me into the reds and orange hues.

Though I arrived to the colors of my living room and kitchen through my rational thought processes, subliminally I believe Lucille may have been guiding my choices, the piece of wall paper I framed complimented the paint on the walls quite nicely.


New light fixtures were a must, for one my main grievance with the kitchen was the fact that I was always cooking in the shade.  The solitary light fixture in the center of the kitchen cast my shadow directly across the stove.  I needed addidtional light form above.  One that would compliment and work with the breakfast bar that will replace the wall.


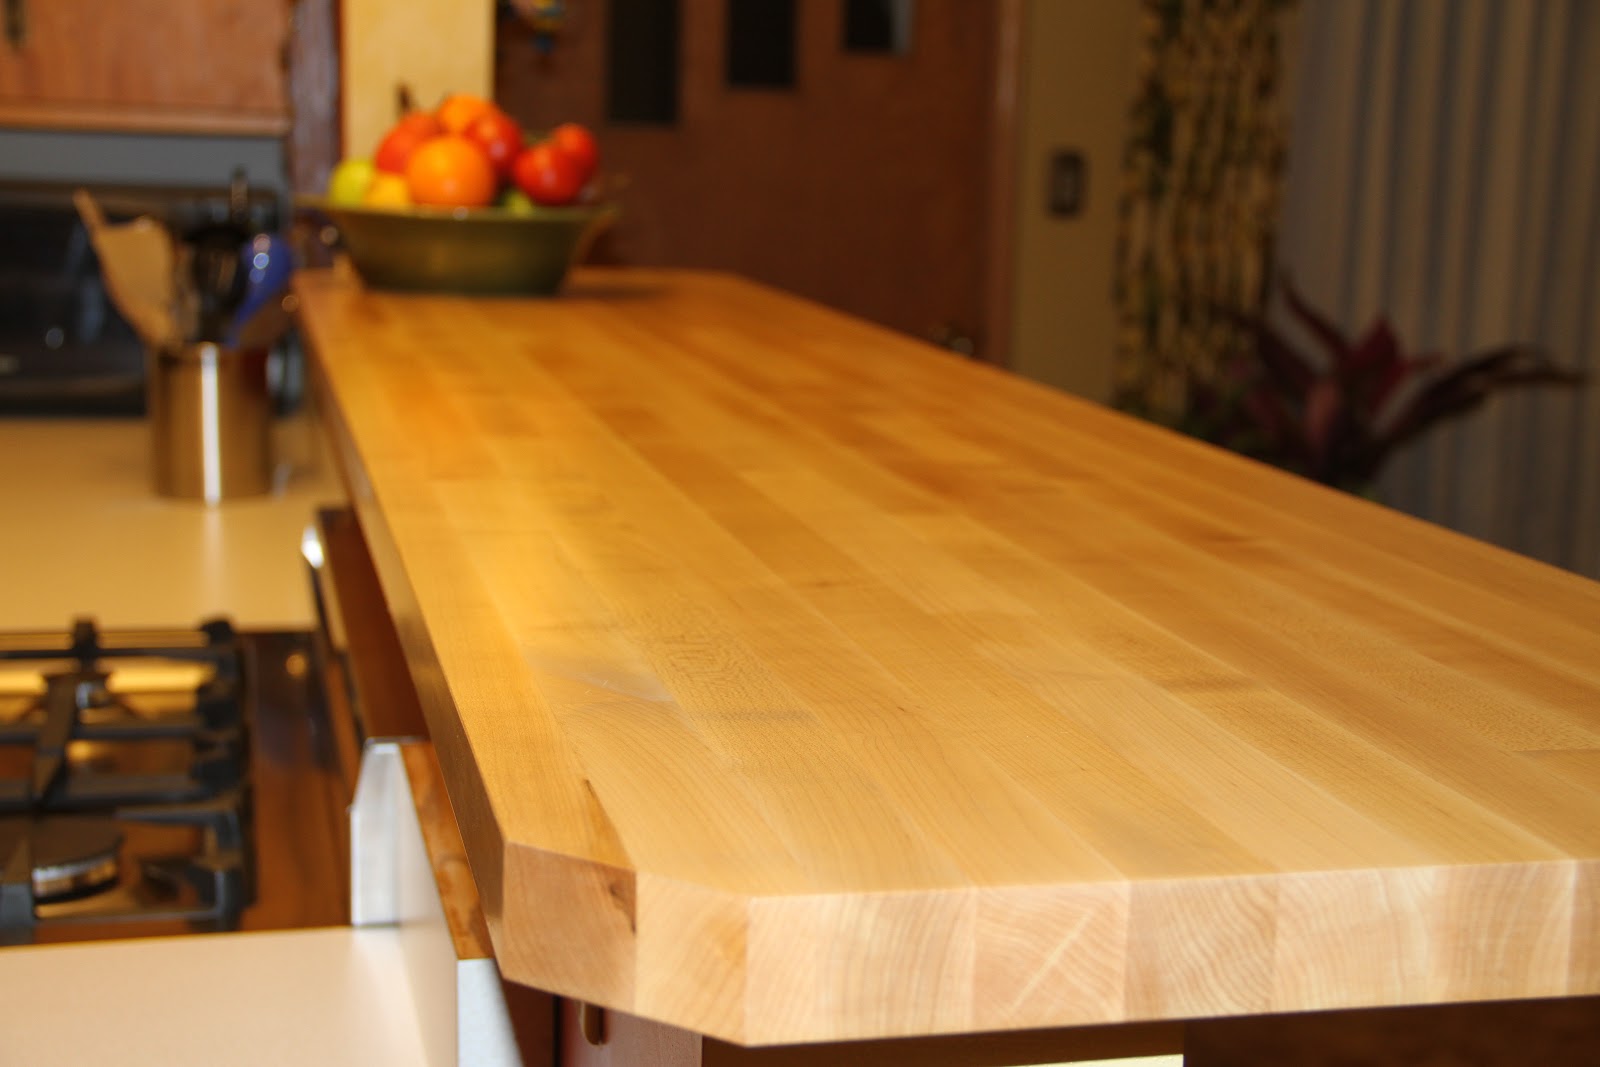
To keep the orginal cupboards, counters and hardware I chose to have my counter for the bar to be cut out of butcher block.  The natural maple finish was a light enough color to compliment the wood features in the kitchen and living room both, yet classic enough to maintain my country home feel.


Replacing my electric stove had to be done.  It still worked, but I needed one with a lower profile that would fit under the bar.  I couldn't have a range with the standard back splash with the dials on it.  I found one the spoke to me, it was simplified and elegant and felt industrial enough for a man's kitchen.  A perfect compliment to my garden's kitchen, sure to be able to handle a fair amount of canning.  It also brought me back into the world of gas cooking which I've always preferred.


The final touch was a floor upgrade, durability and functionality was a must.  I wanted a floor that would utilize and tie in the colors in the kitchen.  The wall color, cabinetry woodwork,  and even the new stainless steel stove.  The existing floor was probably twice my age, probably could last another sixty years....  but no.  After removing the wall, there was a spot of floor exposed without carpet or linoleum.  Sure the piece of barn wood I put there may have sufficed, but I guess I've become classy through this process.


The project has been mostly finished for a few weeks now, and already I have had the opportunity to make dinner for some groups of people.  To see this space function exactly how I had dreamed has given me a fresh excitement for my home and helped transform my vision for the future. Though this will always be the house that Dan & Lucille built, through time I truly can make it mine.


Monday, October 17, 2011

'Ser Salsa Verde es Facil'

What happens when you plant four tomatillo plants in your backyard garden?

You realize by the end of the summer that you've done nothing with them and there is ripe fruit sprawling throughout that corner of the garden. Which can mean only one thing: another canning adventure on Mainstreet!   In a house without a complete kitchen, the plan was to a make a small batch of Salsa Verde for fajitas: simple, Make Dinner and Eat Salsa.  
The recipes I found were a bit more involved than just a small batch for dinner.  And besides I had the quantities of of ingredients for enough to can a whole batch, and then some.  As I began to compare the three recipes I found, one in Balls Blue Book of preserving, the other two were web sources I realized I liked bits of all three, so I took from all to come up with this one.  
Utilizing what I had available from my garden and Mom's pantry (apparently I didn't have white vinegar or cumin) and the store.  Lemon Juice and Lime Juice... I've yet to get any of my citrus trees to bear fruit (let alone live) in my Minnesota backyard. 
'Ser Salsa Verde es Facil'
Ingredients:
Chop & Cook:            
8 cups of Tomatillo
2 cups of Onions
7 Ancho Hot Peppers
8 Cloves of Garlic
2 Jalapenos
Add:           
½ cup of Vinegar (white)
½ cup of Lime Juice
½ cup of Lemon Juice
2 tsp Cumin
½ tsp Salt
¼ tsp Sugar
Directions:
Bring salsa to a boil then simmer for 20 min to an hour, or until Salsa reaches desired thickness. Fill salsa into sterilized half pint jars and hot water bath process for 20 mins.  
After over on hour of finely chopping vegetables, my brother who was keeping me company (not helping, just keeping company) said, 'Well I am going to bed, but it looks like you've got at least another 45 minutes left of chopping those tomatillos.'  At that point I decided I had enough chunks to the salsa and concluded that the rest could be blended.  After adding the halved tomatillos to the blender with the vinegar needed for the recipe, I myself was in bed within 5 minutes and the chopped veggies were in the fridge waiting to be cooked down the following night.
 
 Not knowing how it was all going to end up... and assuming it would be a better snacker salsa than a stand alone meal like my family's tomato based salsa, I decided to use tiny (4oz) jars.  They are cute and could be used as single serving salsa jars or as gifts.  I didn't thing a single quart jar would be a wise use of salsa or time, since it would have taken up most of the batch.

I am very satisfied with the end result of the salsa... thirteen 4 oz jars.  The home grown products may have slowed down the chopping, my onions were all smaller than ping pong balls.  I spun quite a few LPs during the process.  I could bump up the heat next time around... more Jalapenos or even Serrano peppers like one of the recipes suggested.  There is a strong citrus finish that I enjoy but may scale the lemon/lime back just a bit.  The white vinegar adds some acidity so there isn't such a need for citrus juice.

Mighty tasty, I found another great condiment to add to my morning egg routine. 

Guide to Garlic Planting

Andrew’s Guide to Planting Garlic

Here we plant garlic shortly after the first frost, optimally early to mid October.  You’ll want to start with preparing the soil: Roto-til, break up the hard pan/ add compost, etc.  Garlic likes loose and rich soil with good drainage. 

The night before you plan on planting: Separate out the cloves from the bulbs, leaving the outer layer of skin still on individual cloves. 

Soak overnight in water (1 Tbs Baking Soda to 1 gallon of water), this process essentially ‘wakes up’ the cloves and helps them get a jumpstart on hydrating.

The following day: drain off water mixture.
Garlic in each bowl is a different variety soaking before planting.


An additional step would be to soak the cloves in Rubbing Alcohol for 4 minutes, this will kill off any soil contaminates that may have arrived in seed bulbs and will help ensure you will have healthy plants. 

Place each clove in a hole 4” deep and 6-8” apart.  Pointed end up, root base on bottom of hole.  Cover with compost and mulch.     

Burry and wait.  Within 4-8 weeks the cloves will begin to sprout, what is important is they are setting their roots to hold them in place through the winter.  Growing garlic in the northern climates it is recommended that you use hardneck varieties and mulch them for winter protection. 

When green sprouts in spring, make sure you have a nice coverage of mulch to keep weeds off the plants, garlic doesn’t enjoy weed competition.  Keep them irrigated through June, garlic needs an 1” of rainfall per week… but stop any fertilizing in the middle of May.  Weeding is important, as weeds steal moisture and nutrients from your plants and rob you of bulb size. 

Remove the “scapes” as they appear.  This too will limit bulb size.  Once the curly stems are 10” tall they make a great addition to soups and stir fry. Scapes provide some great garlic flavor, I've had great luck just throwing them whole into crock pot recipes. 

Watch:  as plants mature you can begin harvesting when the first bottom leaf begins to yellow and before the three from the bottom brown and shrivel.  Planting more than one variety of garlic allows you to have different maturation times and can extend your garlic harvest. Harvest while they still have five green leaves, after that point the cloves may begin to separate from each other. 

Allow to dry in a shady, breezy locations for two – four weeks to cure.     

Store the Garlic in net bags with 50-70 degrees and 45-55 percent humidity.  Don’t refrigerate. 

Find a use for garlic in every meal, can you?  Its delicious.

                                                                        Questions? andrew@walochfarm.com

Sources of Information and Garlic that I've used.

Friday, September 23, 2011

Ladies in My Backyard


Milk crate run for my three Cuckoo Marans chicks.
(not quite a hen's dream come true)
This spring I made a promise to three very important ladies in my life.  I gave them my word that I'd provide them with everything they could ever need. Three ladies in my life... well chicks: soon to be hens.  Cuckoo Marans hens to be exact, known for their exceptionally dark eggs and their striking black and white plumage. 

Starting this winter I began looking into chicken coop designs.  In the long term I'd like to convert one of my sheds out back into a multi-pen chicken coop where I can raise a variety of chickens; different breeds, sizes and uses.  That coop of my dreams is a ways out and a bit beyond my current coop budget.  Besides, there are many visionary coop designs that balance style with functionality.  I drew my inspiration off of the coop deville a very nice looking coop.

What I liked about many of the different coops I found online was the concept of a 'chicken tractor'. It is essentially a coop on wheels with no bottom that can be walked throughout the yard, allowing the chickens to scratch and eat a fresh patch of grass or garden every few days. The chickens themselves can be the rototiller in the garden between growing seasons. 

My car gave up its space in the garage for the coop construction; giving me the extra motivation to keep working on it throughout the busy summer.  The hens where carted in and out of the barn as the weather permitted.  The goal became to finish the coop before they began to lay, which I thought would be a fairly manageable deadline.  Especially, because it takes a pullet 20-24 weeks before they reach laying maturity.  Ironically, their laying is also greatly effected by day length and won't begin to lay eggs in the fall without supplemental lighting.  Turns out I had plenty of time.

Either way, I was determined to get these chicks a home.  Like many of my projects around the home and yard this one was fueled by materials on hand, scraps from other projects and re-purposed parts.  Everything besides the fasteners, wire, skid boards and wheels I had at the homestead.  Roof and siding were scraps from a project at the garden center, 2x4s were re-claimed boards and the widow was sitting in my garage.  The linoleum flooring was left-over scraps from salvaged flooring used in one of my basement rooms.  In a sense, this project was a great opportunity to clean up the garage. 

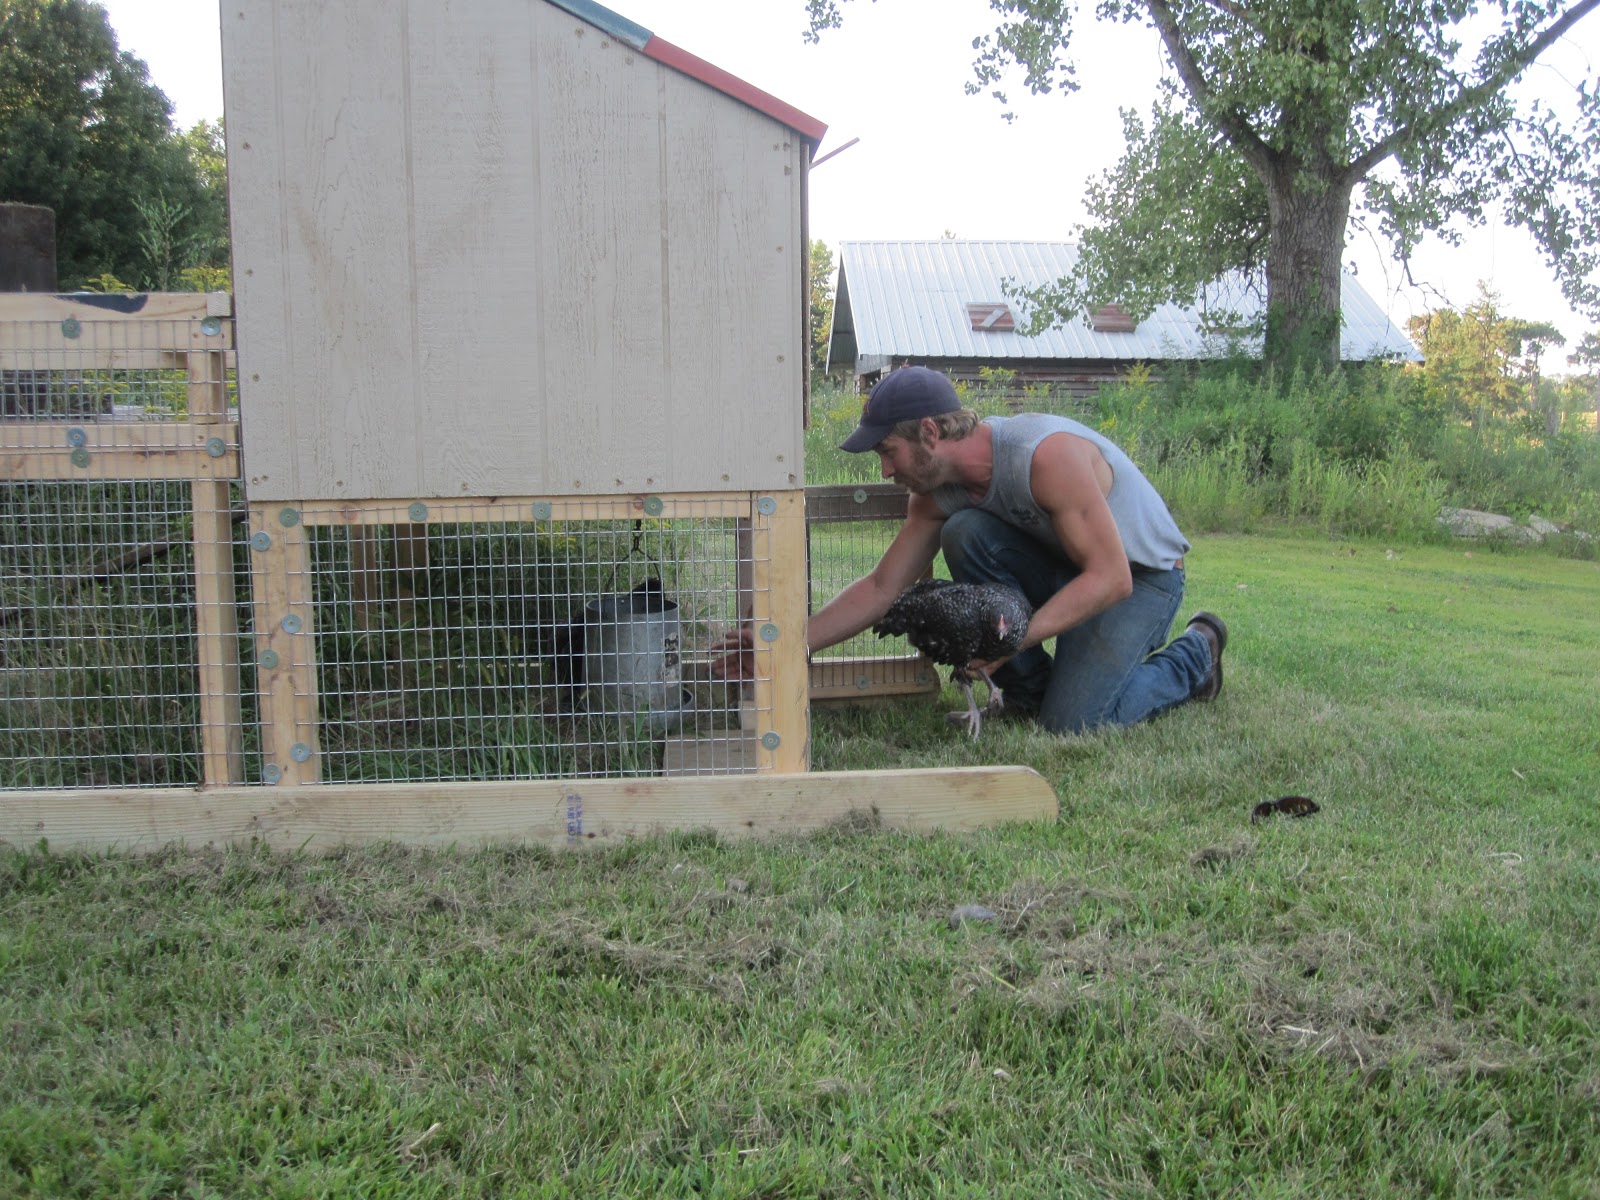
Access from underneath provides daytime shade
and keeps the food dry and water in place when pen moves.
(wheels and handle were added after initial chicken release)

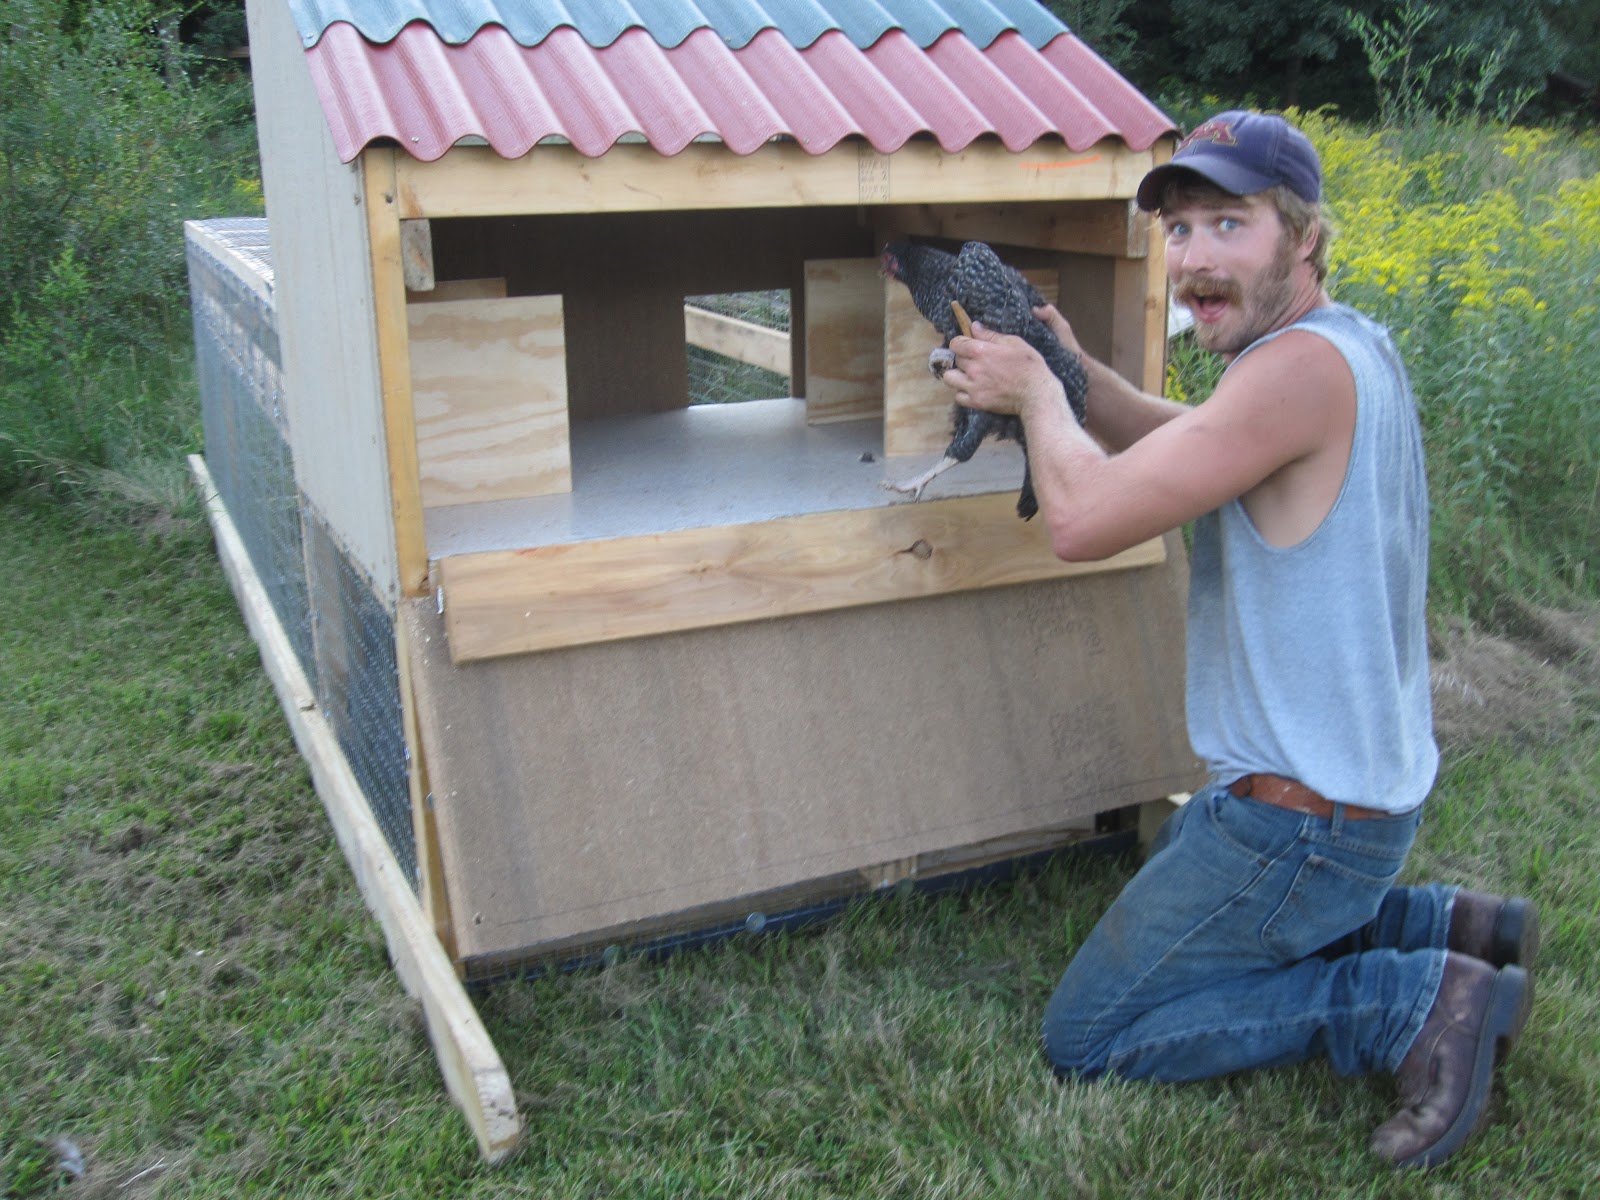
Drop down back panel allows for easy cleaning,
nesting boxes are also detachable.
Their first night in their new home.
I finished the coop with time to spare the chickens have spent the better part of a month in their new home.  These three chickens make quick time with the grass and have had to be moved to a new patch every few days. And I am still waiting on that first egg. 

For the winter they'll spend it at their boyfriend's coop over at my folks'... we'll have to see what happens to my flock's numbers this spring.  

Update:  9/26/11
Shortly after moving the hens into my folks' chicken coop with the supplemental lighting, one of the hens laid her first egg.  Pictured is the Cuckoo Marans egg with some of the other variety of size and colors from the farm coop.

Monday, September 12, 2011

Ice Cream Disaster to Malt Make-over

In the summer I don't end up going grocery shopping all that often.  Perhaps that is why recently when I got back from the store I became distracted by another task at hand and the Ice Cream was left on the counter.

What a disappointing moment, to discover my two quarts were sitting on my counter soft to the touch.  Not ready to give up on them I put the now soft serve ice cream back into the freezer to grieve.  Everyone knows that melted eice cream is never as good after it has been refrozen.  The texture never recovers.  Upon a friend's suggestion I decided my only option was to re-purpose the ice cream.  When life melts your ice cream, make a malt.

Using my re-frozen vanilla ice cream I added: 
4 generous scoops: Ice Cream
1 Orange
2 Splashes of Lemon Juice
1.5 cups of Frozen Wild Black Raspberries (few currants mixed in)
Milk for ease of blending
And a bit of left over Strawberry Rhubarb Wine for fun.

Since then, I've used up both my Vanilla and Bordeaux Chocolate Cherry melty ice creams.  Using a combination of the above ingredients, but also using some of my mint mead to which worked really nicely with the chocolate in the cherry ice cream.    

I must say, that certainly is some salvaged ice cream.  So tasty.