Monday, October 17, 2011

'Ser Salsa Verde es Facil'

What happens when you plant four tomatillo plants in your backyard garden?

You realize by the end of the summer that you've done nothing with them and there is ripe fruit sprawling throughout that corner of the garden. Which can mean only one thing: another canning adventure on Mainstreet!   In a house without a complete kitchen, the plan was to a make a small batch of Salsa Verde for fajitas: simple, Make Dinner and Eat Salsa.  
The recipes I found were a bit more involved than just a small batch for dinner.  And besides I had the quantities of of ingredients for enough to can a whole batch, and then some.  As I began to compare the three recipes I found, one in Balls Blue Book of preserving, the other two were web sources I realized I liked bits of all three, so I took from all to come up with this one.  
Utilizing what I had available from my garden and Mom's pantry (apparently I didn't have white vinegar or cumin) and the store.  Lemon Juice and Lime Juice... I've yet to get any of my citrus trees to bear fruit (let alone live) in my Minnesota backyard. 
'Ser Salsa Verde es Facil'
Ingredients:
Chop & Cook:            
8 cups of Tomatillo
2 cups of Onions
7 Ancho Hot Peppers
8 Cloves of Garlic
2 Jalapenos
Add:           
½ cup of Vinegar (white)
½ cup of Lime Juice
½ cup of Lemon Juice
2 tsp Cumin
½ tsp Salt
¼ tsp Sugar
Directions:
Bring salsa to a boil then simmer for 20 min to an hour, or until Salsa reaches desired thickness. Fill salsa into sterilized half pint jars and hot water bath process for 20 mins.  
After over on hour of finely chopping vegetables, my brother who was keeping me company (not helping, just keeping company) said, 'Well I am going to bed, but it looks like you've got at least another 45 minutes left of chopping those tomatillos.'  At that point I decided I had enough chunks to the salsa and concluded that the rest could be blended.  After adding the halved tomatillos to the blender with the vinegar needed for the recipe, I myself was in bed within 5 minutes and the chopped veggies were in the fridge waiting to be cooked down the following night.
 
 Not knowing how it was all going to end up... and assuming it would be a better snacker salsa than a stand alone meal like my family's tomato based salsa, I decided to use tiny (4oz) jars.  They are cute and could be used as single serving salsa jars or as gifts.  I didn't thing a single quart jar would be a wise use of salsa or time, since it would have taken up most of the batch.

I am very satisfied with the end result of the salsa... thirteen 4 oz jars.  The home grown products may have slowed down the chopping, my onions were all smaller than ping pong balls.  I spun quite a few LPs during the process.  I could bump up the heat next time around... more Jalapenos or even Serrano peppers like one of the recipes suggested.  There is a strong citrus finish that I enjoy but may scale the lemon/lime back just a bit.  The white vinegar adds some acidity so there isn't such a need for citrus juice.

Mighty tasty, I found another great condiment to add to my morning egg routine. 

Guide to Garlic Planting

Andrew’s Guide to Planting Garlic

Here we plant garlic shortly after the first frost, optimally early to mid October.  You’ll want to start with preparing the soil: Roto-til, break up the hard pan/ add compost, etc.  Garlic likes loose and rich soil with good drainage. 

The night before you plan on planting: Separate out the cloves from the bulbs, leaving the outer layer of skin still on individual cloves. 

Soak overnight in water (1 Tbs Baking Soda to 1 gallon of water), this process essentially ‘wakes up’ the cloves and helps them get a jumpstart on hydrating.

The following day: drain off water mixture.
Garlic in each bowl is a different variety soaking before planting.


An additional step would be to soak the cloves in Rubbing Alcohol for 4 minutes, this will kill off any soil contaminates that may have arrived in seed bulbs and will help ensure you will have healthy plants. 

Place each clove in a hole 4” deep and 6-8” apart.  Pointed end up, root base on bottom of hole.  Cover with compost and mulch.     

Burry and wait.  Within 4-8 weeks the cloves will begin to sprout, what is important is they are setting their roots to hold them in place through the winter.  Growing garlic in the northern climates it is recommended that you use hardneck varieties and mulch them for winter protection. 

When green sprouts in spring, make sure you have a nice coverage of mulch to keep weeds off the plants, garlic doesn’t enjoy weed competition.  Keep them irrigated through June, garlic needs an 1” of rainfall per week… but stop any fertilizing in the middle of May.  Weeding is important, as weeds steal moisture and nutrients from your plants and rob you of bulb size. 

Remove the “scapes” as they appear.  This too will limit bulb size.  Once the curly stems are 10” tall they make a great addition to soups and stir fry. Scapes provide some great garlic flavor, I've had great luck just throwing them whole into crock pot recipes. 

Watch:  as plants mature you can begin harvesting when the first bottom leaf begins to yellow and before the three from the bottom brown and shrivel.  Planting more than one variety of garlic allows you to have different maturation times and can extend your garlic harvest. Harvest while they still have five green leaves, after that point the cloves may begin to separate from each other. 

Allow to dry in a shady, breezy locations for two – four weeks to cure.     

Store the Garlic in net bags with 50-70 degrees and 45-55 percent humidity.  Don’t refrigerate. 

Find a use for garlic in every meal, can you?  Its delicious.

                                                                        Questions? andrew@walochfarm.com

Sources of Information and Garlic that I've used.

Friday, September 23, 2011

Ladies in My Backyard


Milk crate run for my three Cuckoo Marans chicks.
(not quite a hen's dream come true)
This spring I made a promise to three very important ladies in my life.  I gave them my word that I'd provide them with everything they could ever need. Three ladies in my life... well chicks: soon to be hens.  Cuckoo Marans hens to be exact, known for their exceptionally dark eggs and their striking black and white plumage. 

Starting this winter I began looking into chicken coop designs.  In the long term I'd like to convert one of my sheds out back into a multi-pen chicken coop where I can raise a variety of chickens; different breeds, sizes and uses.  That coop of my dreams is a ways out and a bit beyond my current coop budget.  Besides, there are many visionary coop designs that balance style with functionality.  I drew my inspiration off of the coop deville a very nice looking coop.

What I liked about many of the different coops I found online was the concept of a 'chicken tractor'. It is essentially a coop on wheels with no bottom that can be walked throughout the yard, allowing the chickens to scratch and eat a fresh patch of grass or garden every few days. The chickens themselves can be the rototiller in the garden between growing seasons. 

My car gave up its space in the garage for the coop construction; giving me the extra motivation to keep working on it throughout the busy summer.  The hens where carted in and out of the barn as the weather permitted.  The goal became to finish the coop before they began to lay, which I thought would be a fairly manageable deadline.  Especially, because it takes a pullet 20-24 weeks before they reach laying maturity.  Ironically, their laying is also greatly effected by day length and won't begin to lay eggs in the fall without supplemental lighting.  Turns out I had plenty of time.

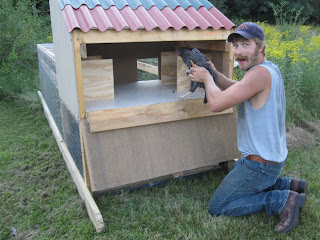
Either way, I was determined to get these chicks a home.  Like many of my projects around the home and yard this one was fueled by materials on hand, scraps from other projects and re-purposed parts.  Everything besides the fasteners, wire, skid boards and wheels I had at the homestead.  Roof and siding were scraps from a project at the garden center, 2x4s were re-claimed boards and the widow was sitting in my garage.  The linoleum flooring was left-over scraps from salvaged flooring used in one of my basement rooms.  In a sense, this project was a great opportunity to clean up the garage. 

Access from underneath provides daytime shade
and keeps the food dry and water in place when pen moves.
(wheels and handle were added after initial chicken release)

Drop down back panel allows for easy cleaning,
nesting boxes are also detachable.
Their first night in their new home.
I finished the coop with time to spare the chickens have spent the better part of a month in their new home.  These three chickens make quick time with the grass and have had to be moved to a new patch every few days. And I am still waiting on that first egg. 

For the winter they'll spend it at their boyfriend's coop over at my folks'... we'll have to see what happens to my flock's numbers this spring.  

Update:  9/26/11
Shortly after moving the hens into my folks' chicken coop with the supplemental lighting, one of the hens laid her first egg.  Pictured is the Cuckoo Marans egg with some of the other variety of size and colors from the farm coop.

Monday, September 12, 2011

Ice Cream Disaster to Malt Make-over

In the summer I don't end up going grocery shopping all that often.  Perhaps that is why recently when I got back from the store I became distracted by another task at hand and the Ice Cream was left on the counter.

What a disappointing moment, to discover my two quarts were sitting on my counter soft to the touch.  Not ready to give up on them I put the now soft serve ice cream back into the freezer to grieve.  Everyone knows that melted eice cream is never as good after it has been refrozen.  The texture never recovers.  Upon a friend's suggestion I decided my only option was to re-purpose the ice cream.  When life melts your ice cream, make a malt.

Using my re-frozen vanilla ice cream I added: 
4 generous scoops: Ice Cream
1 Orange
2 Splashes of Lemon Juice
1.5 cups of Frozen Wild Black Raspberries (few currants mixed in)
Milk for ease of blending
And a bit of left over Strawberry Rhubarb Wine for fun.

Since then, I've used up both my Vanilla and Bordeaux Chocolate Cherry melty ice creams.  Using a combination of the above ingredients, but also using some of my mint mead to which worked really nicely with the chocolate in the cherry ice cream.    

I must say, that certainly is some salvaged ice cream.  So tasty.


Monday, August 8, 2011

Bonsai Bonanza

There's a story of a man who takes a bonsai tree to a get help from a Master.  After hours of tinkering, pruning, and wiring this bonsai together the Master said; 'Very good... now in ten years, if you keep this up you'll have an OK bonsai.' Imagine a goal ten years out to be 'OK', not remarkable, just okay.  For some people that kind of pacing might be discouraging, but I find it inspiring. 

The world we live in is full of fads, phases and fleeting moments. To put forth the dedication for results that may come after decades of work has been lost in this time of fast food and key strokes.  Impatience has been equated to drive and ambition in a world of get it done to get ahead.  But speed doesn't always give us the quality of life or the substance we require to cultivate lasting relationships with the people and places around us. 

I don't want to admit it but my fascination of bonsai could be traced back to the first time I watched the 'Karate Kid'.  Mr Miyagi's whole mantra of hard work and persistence as training for life and the ring, rang true to me then and even more so now. 

It is said that an unmaintained tree will ultimately out grow it's ability to support itself.  Even trees in our own yards can out grow their potential and become hazards to themselves and others.  Canopy maintenance and branch selection can be just as important in a large scale tree as it is in the miniaturization of trees.  Bonsai allows these miniaturized trees to have the ability to live on indefinitely, giving these trees the opportunity to out live their full sized counterparts.  That is if someone is willing to tend to these living artworks over the course of centuries. 

I currently limit myself to three bonsai trees.  One indoor plant that resides in my kitchen, it is an Hedera helix; English Ivy.  This is actually a vine that grows outside in more mild climates but can be used as a house plant as well.  I've trained this vine into a dwarf tree with a fairly informal structure, been working with this tree for over 33 months now.

The other two are both Holmstrup Arborvitaes, both evergreens I've been maintaining over the last two years.  One of which is in a heads up competition against my brother's bonsai. We started them from the same shrub and challenged each other to a ten year bet.  Whoever has the best looking bonsai of the two after ten years wins. (10 bucks... a dollar a year) It may be as simple as who ever can keep theirs alive for ten years.  The first few years are just structural laying the ground work, building girth and taper on our trees of small stature.  We'll see how they evolve over the coming decade...

An article I was reading about bonsai talked about a curator of a bonsai society who claims to have a bonsai collection with over 70 specimens.  Of those 70 trees, he would be willing to show ten of them, leaving the other sixty works in progress.  Are there museums for unfinished Rembrandts?  I don't know. 

Bonsai is the greatest example of Art mimicking Life.  The artist can recreate the forms seen in nature and reproduce them in a much smaller scale, utilizing life itself as it's canvas.  Making a beautiful circle of life and art.  

Thursday, July 14, 2011

When life gives you strawberries...

Its not nearly as discouraging or overwhelming as when life is dealing out lemons, but as I've always said...well not always, but I've been known to say... or at least I have said once: 'When life gives you strawberries, make Daiquiris!' That statement could have been followed by make Jam or Pie or even strawberry drizzle for Vanilla Ice Cream... but Daiquiris are more fitting with the beverage theme of lemons into lemonade.  Not to mention delicious.

Now through my short time as a consumer of this tasty iced beverage I've discovered you never know what caliber of daiquiri that you'll get at a bar or restaurant. If you need one that is hearty and refreshing home made is best. I've tried a few different strategies while making my own at home.  The actual fruit blended with the white rum, ice and daiquiri mix is a must, but after some important hands on research I come to the conclusion that frozen strawberries add much more complexity to the drink than fresh ones.  

When using frozen strawberries another key factor is to blend the ice cubes before adding the frozen strawberries.  If blended at the same time you lose any of the texture the berries have to offer. I like my daiquiris more like a meal than a drink... the fruit chunks are a necessity. There is nothing worse than getting a strawberry icee claiming to be a daiquiri only to be flavored with rum and red food coloring.

Home grown berries pack much more sweetness than store bought ones.  Knowing this and having the opportunity to pick strawberries in my mother's private berry patch, I knew exactly what I wanted to do with my share of the harvest.  During berry season they need to be picked nearly every day, or the fruit will become overripe and spoil.  As the season progresses the berries get smaller and less attractive, as my luck has it my turn was at the tail end of the berry crop and things were getting a bit suspect.  Although there were slimmer pickings and less desirable fruit I was not dismayed; with daiquiris being my end game aesthetics were not a driving factor in berry choice.  Everything with enough red made it into the berry box.

Once they made it home they got a quick rinse, were allowed to dry of in a colander.  The cleaning and freezing was pretty straight forward.  I removed the stems and bruising and placed them in daiquiri ready pint-sized freezer safe bags. 
Did I mention I liked my daiquiris chunky?  No, the straw was used to get all the air our of the bag. 
Each bag measured our for a single batch of drinks and placed into the freezer to await a worthy libation.
I have the macrame lawn chairs and a blender... who's gonna join me?  I've got the berries, will you bring the rum?

Tuesday, June 28, 2011

Lucille's Circle

When I first moved into my house, as a renter, the only stipulation to the lease was that I was in charge of planting Grandma Lucille's circle.  A responsibility that I didn't take lightly.  It was the only bit of gardening that was still being don at the place and it was in a prominent location in the yard. I can still hear her saying 'When are you going to plant that circle?', well I was able to get around to it this June. 

My choice of plant material really depend on the plants in excess at work. The last two years we have had an abundance of coleus left by my planting time (always around Mid June).  This allowed me to be a bit quirky with my design.  In 09 I  planting a Yin and Yang utilizing light and dark leafed varieties of coleus. I have always enjoyed the philosophies behind the the Ying Yang.  To all thing there must be a balance. Dark:Light Male:Female High:Low Hot:Cold  At the heart of the philosophy are the two poles of existence, which are opposite but complementary.  Though being opposite each is necessary to truly appreciate the other.   For every summer there must be a winter, and season of growth and season of rest.  Which is one reason I love the Minnesota the Winter provides the cleansing cold to allow the vibrant rebirth of spring and summer.  Whether the battle for balance is internal or its a search for balance in your surroundings, I find its best to do the search grounded... or at least in the ground.

Last year I reprized the coleus symbol theme.  It was simply a smiley face, Electric Lime and Red Ruffles coleus.  It caught the mood of the season, sun a happy time.  As it grew together it was quite the enjoyable thin to see each day leaving my driveway.

This year, due to new efforts at work for inventory control there was not enough of any two coleus to make a statement.  So instead I walked the Garden Center for inspiration, sometimes it only takes one plant to determine the mix of a whole arrangement or garden. Inspiration struck with 'Field of Dreams' Ornamental Corn.  Its a brand new plant variety and was the rave of the California Spring Plant Trials, raised alot of eyebrows and made some waves in the trade magazines. The corn in variegated green & white with not so subtle pink stripes work it.  It can grow 4-5 feet and produce small ornate cobs of corn. 

From there a theme emerged, I added 'Purple Flash' ornamental pepper.  A new variety of pepper w/ purple foliage and pink and white splashes of variation.  The deep color of the pepper should stand out in from of the lightly colored corn.

 Also used was Verbena bonariensis, Supertunia Raspberry Blast, and Margarita Sweet Potato vine.

In the past few years the lines between and ornamentals have begun blurring as more people integrate edible plants into their landscapes and breeders make introductions of plant material that was once plainly a vegetable and now has some amazing unique aesthetic value.  The palette of color and textures for the garden is ever increasing. 

This garden showcases three such plants, while the Verbena and Petunia add a some needed flair.  The others are a new way of looking at some old classic crops, reinventing themselves for a whole new purpose.  Just as we must do, integrate the old with the new.  We must truly appreciate the opportunities given to us and the new and different ways to look at things, and all we can hope to do is try to learn something from it all. 

Each year I will plant Grandma's Circle, it has become a sacred routine, but what I plant can change each year.  That gives me both the structure and freedom of spirit that one needs in life.  Which brings me back around to balance.

Monday, June 20, 2011

Tomatotastic and Pepperific!


You want to see me excited set down a vine-ripened tomato in front of me.  It’s good to be able to take enjoyment from the most simple of things. I've always gravitated to tomatoes' juicy, delectable goodness. Now peppers, I really didn't let them into my life until senior year of college.  A professor handed me a fresh bell pepper while on an organic vegetable garden tour, one bite into that fresh red bell pepper and my dietary world had been broadened.  Tomatoes are still my favorite, but its a good thing that they play so nice together.
The versatility of this most precious fruit is unmatched in my mind.  There are a few tomato based staples in my life; pasta sauce, barbeque sauce and of course salsa.  All of which I've made in the past and plan to once again.  Other great uses are out there and I love to eat, it goes hand in hand. But before we get to consumption there is a lot of hard work to get us to that point.
Ground preparation is very important, practices of rototilling, adding amendments; peat moss & compost. The unique structure of peat moss improves the soil's water & air holding capacity. Compost adds organic matter and nutrient holding abilities. Growing in the glacial outwash that is the Anoka sand plains soil structure becomes a big concern.  Trying to fix your soil in a single year could become an extensive and expensive task.  Instead practice good land stewardship and over time the dirt you started with can become the life giving soil you deserve. 
Peat moss and compost added to the soil, concentrated in where the rows of veggies will be planted.  


Last year I had a devastating run in with the blight, most everyone I know had a hard time with their tomatoes. The growing season was not conducive to tomatoes, my vines began to wither and it seemed like the crop was doomed. It was a scary sight and I began to panic and hoard the tomatoes I could.
This year I decided to do things a bit different, weeds and disease are two big concerns.  Many commercial growers have adapted to using plastic mulch as a barrier between the soil and the plant. I wanted to do something of the same, but also want it not to be wasteful.  By using landscape fabric I could reuse it from year to year and still have the weed and soil barrier.  Plastic fabric over plastic allows water and air to pass through, I don’t want my watering to be overhead and need it to be more efficient. (That will be tackled another day, I've got some ambitious plans for plant hydration).

A propane torch made the holes in the fabric for each plant, melting the plastic to prevent fray. 


I dug the hole with a post hole digger, filled each with water before adding the plant.  After placing the tomatoes I back filled the holes with soil and compost, then watered again.

That’s enough detail on the planting, what it is really about is the plants. Altogether on this day of planting I was able to plant 34 tomatoes and 34 pepper plants.  But I struggled even narrowing it down to these numbers.  Most of my tomatoes are heirlooms; 1) out of curiosity, 2) I have access to plenty of conventional tomatoes from work, and 3) The different colors, tastes and textures allow for a lot of tomato improvisation.  The variety of different uses of each of these will provide for some excitement this fall.  

This last year I saved some seeds from some unique peppers that didn't grow true to type.  From this seed I started plants for the garden to see if they grow into the same pepper. One was a purple bell pepper that grew long and twisted and the other was a lime colored Ancho hot pepper. I have always been drawn to plants that are different, something unique and perhaps even a new variety.  Whether I ever take the step further into plant breeding that would be a whole other venture, but would be quite fun. I also planted a few hots and some sweet peppers, a range of shapes and colors. 
Last few peppers to plant, the diagram shows the list of varieties chosen for the garden. 

There will be a rundown of varieties and uses to come. But I wanted to get this updated.  Thirty-four plants of each peppers and tomatoes are probably more than a man needs, especially when his only roommate doesn’t eat either.  I do love my fresh veggies but not everything needs too be eaten freshly, that is where my passion for preserving the harvest comes into play.  I’ve got my favorite recipes, but am always on the look out for a new or old recipe to try.     


Wednesday, June 8, 2011

Just a bit Exposed...

Do you ever feel exposed? Like everything you do is out there for the world to see.  Thats how I feel about my front yard at times, its one reason I enjoy the sanctity of the backyard yard. Two years ago I was chatting with a customer at work and she asked who was living at my Grandparents old place. I told her it was me, and she told me she was glad I was still feeding the birds in the bird feeder in the front lawn. I guess the neighborhood likes to keep watch, it is even a bit comforting to know they care.

No matter how much work needs to be done on the house and the other out buildings I always believed the first improvements would come with landscaping (even the bird feeder is long overdue for a face lift). The proper use of trees and shrubs can soften any exterior of a house, or provide the necessary buffer or screen. Lets just say there is a bit of softening that can be done around my place. One wake up call was when my mother was talking with a new employee about where I live, and she proclaimed 'Oh the abandoned farm?' It was never abandoned, but hasn't been updated in decades. To tackle the plethora of projects and updates necessary with the buildings on the property will be a long journey, with budgetary and time scarcity concerns, this is a journey I wish travel but will be packing a lot of patience.
But I can do something about my feelings of overexposure, it does not take much time to plant a tree.  Or ten.  Or twenty.

I've always been a big fan of hedges, I've joked that if I ever get in an auto wreck it'd be because I got distracted by someone's hedge.  A well manicured hedge can be an amazing sight to see, it showcases a gardener's true patience and vision.  One of my favorite hedge related experiences was on the island of Oahu at the Dole Plantation, they've got a hedge maze made out of hibiscus.  Lets just say amazing.  

This glorious hedge was spotted in Oahu... one of the many inspiring botanical sights I've  seen.

The use of many plants grown as one to form a uniform object, a team. It could be said that Hedges are my favorite team sport and I've got aspirations to be Head Hedge Coach, perhaps someday we'll win the tree pennant.

I have had this dream for some time now; plant some Columnar Maple trees... let them grow to create a living wall.  I saw pictures of this hedge made out of trees, the hedge started four feet off the ground and then was a solid mass of foliage for twenty or thirty feet up.  I get giddy thinking of the potential of these trees growing alongside the county road.

The trees I ordered came bare root, without a root ball there is an urgency to plant them, but the process goes faster and the plants adapt quicker.  

The process took two evening plantings and one early morning digging. An extra pair of hands and a third set of eyes ensured the trees were planted in a row and upright.  Three perfectionist are better than one. Waking extra early one morning to plant a few trees was beautiful. There was a hint of fragrance from the blooming trees; a mix of pear, plum and crab apple blossoms in the air.  The air was still fresh this morning and was accompanied by a gentle breeze, if I every morning was like this one I could become a morning person.

The line of trees, spaced six feet on center.  The first batch planted a week before the others is already leafing out.

Along with the maples which will give me a lovely show of yellow fall color, I planted a cluster of five river birch along the west line of the square.  They'll provide additional screening from the east and some great winter interest with their exfoliating bark.  Its always a bit therapeutic to get something into the ground. The feel of the earth at your fingertips; it gives you a connection to the present and a vision for the future... now I wait.  And water... often.

Monday, May 16, 2011

Not all Moles are Beauty Marks

 Plans and progress can only do so much... not every outcome can be accounted for or even expected.  It's been a long Winter and with a Spring that isn't standing its ground it is easy to get discouraged.  One unforeseen consequence of having such an abundant cover of snow this year is the survival rate of the Moles. Those little critters must have rested pretty easy this winter.  My yard is checkered with their underground pathways, and they've been busy.  
 In the past I've been one to leave them to their digging, what real harm can they do under that soil.  Turns out grape vines can be tasty, and my Valiant grape plant lost a not so valiant battle with the stealthy critter.  All that is left is a grape twig tied up against its stake, no roots, no connection to the earth.  It's wasn't even uprooted, just de-rooted.  Something must be done.
 I've been on a metaphorical mission of taking back my yard.  It being a yard of a neglect, decades of dilapidation, not because of a lack of love but a lack of time.  I've pledged myself to my yard and plan on bringing it to its former glory and beyond.  But that mission may have to be put on hold as I must literally take back my yard from these underground invaders.  They mustn't be allowed to continue their rampage, the moles will have to face the my wrath for what they did to my grapes.  "I know this... a man got to do what he got to do."

Monday, May 2, 2011

Cloudy days make for Cloudy minds

I have always been someone who plans more than he does.  This isn't saying I don't do things, its more that I spend much more time thinking and planning things.  I have the desire for many things, but am so concerned about doing everything the right way that sometimes it does not get done at all.  This is a constant battle within myself.
My gardening is a great example of these struggles.  I believe I've already begun to make progress, my first example would be my grape vines.  I've been living in my home for three plus years, but was renting for the first two.  As a renter I didn't feel as connected to the property or home to make any physical improvements.  I was renting a place to live and keep my things, but the insecurity of a lease prevented me from tackling issues of the house and yard.  Why would I plant a vine which would take three to four years to bear fruit if I was going to end up somewhere else before that even happened?  Just last year I solidified the purchase of the property and the home is now mine.  Now I have the yard to do all the things I've ever dreamed of in.  My work schedule competes with the free time necessary to devote with yard work.  I became frustrated because I had a yard, I had grape plants, yet I didn't have a trellis to plant them on.  I decided to plant the vines, and tackle the trellis another time.  Sure it felt as though it may be the wrong order, but the vines can wait for the trellis, I on the other hand couldn't wait any longer for progress.  Perhaps sometimes doing things the wrong way is better than not doing things at all.  At least its a start.

This cool, cloudy spring weather really messes with my ambitions for outdoor projects.  I haven't felt the urge to get started on the many things to do in my yard.  The projects within the house have also been quite the distraction, takes a while to paint a room when you only dedicate two to three hours every other day or two.

But I figured I'd put together a list of yard projects that I'd like to see some progress on:

Garlic: Needs Mulch and Irrigation
Fish Pond: Finish the creek between the two pools & release the goldfish for the summer
Build Chicken Coop: Chicks arrive May 14th (though they wont need the coop for a few weeks as chicks)
Deer fence: Additional deer pressure, must protect the tomatoes... June.
Vegetable Garden: I like to supplement my summer cooking with food from the yard.
Hops: I've got three varieties in pots waiting for their place in the sun.
Over-arching Landscape Design: First need to start with a site map of the property.
The Dug-out: This is just what I refer to as the line-up of trees and other plants that are on my list but have yet to find their way into my yard.
Pruning Trees: I started working on the trees in my yard this winter, but they'll need much more work.
Tree Climbing: I've got the gear necessary, I've just got to work on my knots before I start swinging from branches.  This ties into the previous item, best way to prune is secured to the tree.
Perennial Garden: This one will be extensive, mostly shade but it'll be big enough for some morning sun situations as well.  I'll be designing this in my head for quite the while still.
Grape Trellis: I'll need a trellis for the five I've already planted, perhaps even an arbor.  There are quite a few other varieties of grapes I'd like to find room for in the yard as well.

These are just a few of the things I plan on tackling in the backyard, chronicling the progress will be a great opportunity for me to share my experiences but also keep me on task.  Because these cloudy days keep me in my head and out of my yard.

Sunday, April 24, 2011

We all need to Slow Down on Mainstreet!


I have toyed with the concept of a gardening journal or blog as a way of jotting down my plans of plants and visions of vines.  I’ve had the desire to create a bloom log for my home, to note the coming of spring with the emergence of the first blooms and expansion of buds.  Those exercises would allow me to develop a running calendar of events that over years would allow me to predict the changes of the seasons.  For instance if the silver maples bloomed on the twelfth of April this year, and the red maples are usually two weeks behind them… over the years with a running tally that information could lead to some great gardening deductions.  But as I’ve thought about it more I’ve had a hard time limiting myself to topics within the realm of gardens.  

Gardens and their by-products are huge fixtures in my life. I get really passionate when it comes to preserving the harvest. Whether its freezing, drying or canning the harvest I plan on trying it.  In the household I grew up in a lot of our food came from mason jars. To this day, I have a hard time straying from our classic dill pickle recipe.

I like things that take time; I’ve never been one for the instant gratification.  This was the inspiration for the name of the blog, I think its easy for us to become caught up in the fast paced, instantaneous aspects of our lives and I think we all need to Slow Down. For instance, I’ve always wanted to make my own wine.  In my mind I found it was necessary to produce my own grapes before I could make my own wine.  By planting my first five vines just last year it puts my first batch of grape wine a good few years out.  To fill the time, I took up mead production because the honey was readily available, with my brother being a bee-keeper.  Together we’ve dabbled in a few batches. Its a wonderfully exciting process but takes months to reap any reward.   
Pictured here: Secondary Fermentation of Mead batches.
Mint, Chili Pepper and Red Raspberry.

Whether it be working in the soil, watching plants grow, or picking that first ripe tomato… there is nothing else that provides me with such a good balance between patience and anticipation. The posts that follow will be my adventures in my backyard and I'll probably bring you into my kitchen (I've got a few garage projects in mind as well.)